Table of Contents
How to withdraw cryptocurrency
Withdrawal with web
Step 1: Go to the Withdrawal section
Hover over “Assets”, open the menu, and click on Withdrawal from the drop-down list.

Step 2: Select the cryptocurrency you want to withdraw
Use the drop-down menu to select the cryptocurrency you want to withdraw from your OKx account. In our example, we are withdrawing BTC. The withdrawal method options for BTC are “On-chain” or “Internal”.
The supported withdrawal networks are “BTC-Bitcoin”, “BTC-Lightning”, “BTCK-ERC20” and “BTCK-OKExChain”. In this example, we have selected the BTC extracted on the chain through the BTC network.
Click to proceed.

Step 3: Enter and confirm withdrawal details
After you have selected your withdrawal method, enter the withdrawal address of the intended receiving wallet and the amount you want to withdraw. You can also name your receiving address to make future withdrawals faster. Then, select the account you wish to withdraw from.
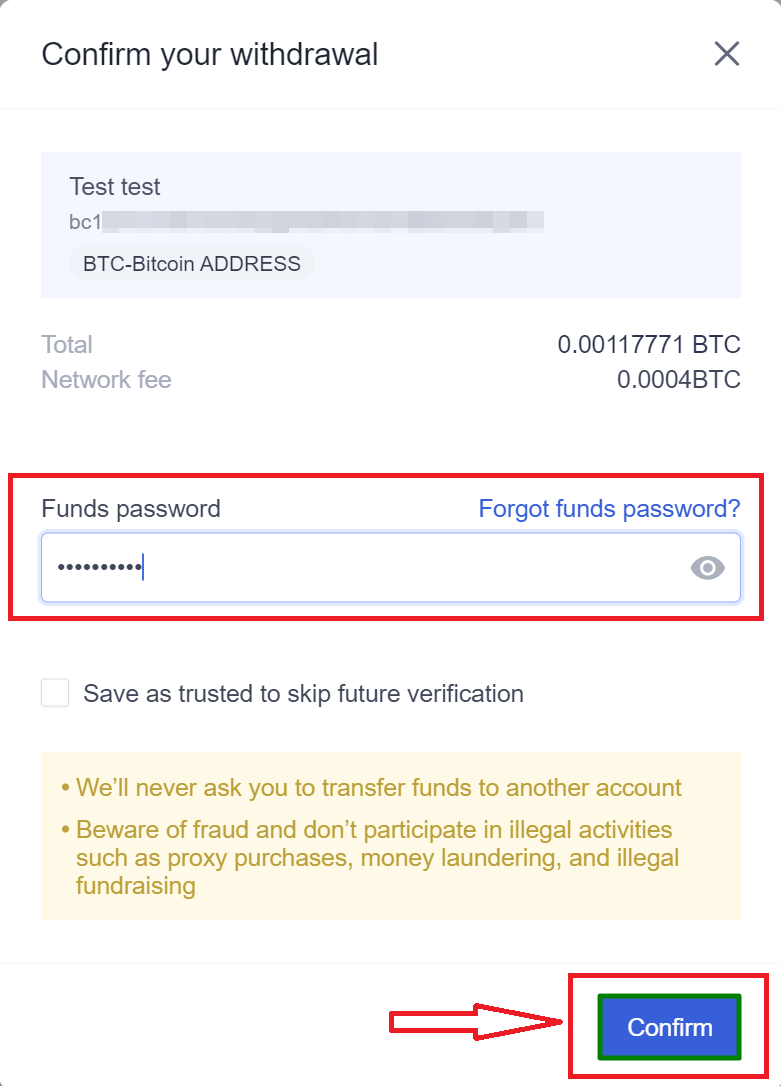
After you have confirmed the withdrawal details, click Continue.
The next pop-up window will ask you for your funds password and, if you have set one, a “SMS code”. Enter them and click Confirm to submit your withdrawal request.
Withdrawal with APP
Step 1: Go to the “Withdrawals” section
On the “Overview” screen, click “Withdrawal”.

If this is your first time using the app to withdraw funds, you may be asked to link your mobile number or authenticator app and set an additional password. If so, click the link to begin the process.

Then, follow the on-screen instructions to connect your OKx account to your authenticator app. Complete email verification and enter the six-digit code displayed in the Authenticator app. Next, set your funds password to access the full feature set of the OKx application.

Step 2: Select the cryptocurrency to withdraw
In the Withdrawals section, scroll down to or search for the cryptocurrency you want to withdraw. Tap on the asset to continue.

Step 3: Enter your withdrawal details
Fill in your withdrawal details. You will need to enter the intended receiving address of the wallet you want to withdraw from and the amount you want to withdraw.
You can usually leave the default withdrawal fees in the “Fees” field. However, if your transaction is particularly urgent, you may consider increasing the fee.
Once you have entered your details, double-check the address and click Submit.

On the next screen, complete the additional security steps by entering the requested password and code. Finally, click Confirm to initiate your withdrawal request.

Once the transaction is confirmed by the relevant blockchain, your funds will appear in the receiving wallet.
How to sell cryptocurrency
1. Log in to your OKx account and click “Buy Cryptocurrency” in the top menu.

2. You will see the “Quick Transactions” tab with the interactive “Buy” widget. Click on “Sell”

3. Select Cryptocurrency and USD from the drop-down menus and enter the amount you want for either currency.

4. Choose the payment method you want from the various payment methods supported by our partners

5. Once your payment has been confirmed, your cryptocurrency will be automatically transferred to your OKx account.
How to sell cryptocurrency using OKx P2P trading
Preliminary steps before using OKx P2P trading
In order to use the P2P trading section of OKx, you need to have an authenticated account (also known as KYC). If you do not have an account yet, you can register here and follow our tutorial.
In addition, you will need to enter at least one payment receipt method into your account in order to sell cryptocurrency and receive fiat currency in exchange. This will be explained in the first step below.
Step 1: Set up a receiving account for OKx P2P transactions
People with verified accounts can log in and click Buy/Sell in the top menu. On the next page, click on P2P trading to open the P2P trading section.

Next, you need to click on Manage and then Settings to start setting up a receiving account before you can perform a cryptocurrency to firecoin conversion.

On the Settings page, you must scroll down to the Payment Settings tab and select Receiving Accounts, then click Add More.

Now you can add a bank account or any other supported payment receiving method to your account. Please note that you cannot change your name in this window, as any payment method you link to your OKx account will need to match your real name.

Once you have added a receiving account, you will be set up to go back to the P2P section and follow the steps below.
Step 2: Select your preferred cryptocurrency and fiat currency
The P2P trading section has several filters available for users to choose their preferences. You can first choose whether you wish to buy cryptocurrency in fiat currency or sell cryptocurrency in fiat currency. After that, you can choose your preferred cryptocurrency and fiat currency, and you can use the optional payment method filter to select a specific payment method.

In this tutorial, we will convert cryptocurrency to fiat currency by selling USDT, so we will select the sell option and will use USDT as cryptocurrency and PKR (Pakistani Rupee) as fiat currency as shown in the screenshot below.

Currently, OKx P2P supports cryptocurrencies including USDT, BTC and ETH, while fiat currencies are available in 28 options, including some of the most popular local currencies around the world.
Step 3: Choose an advertiser from the available options
In order to convert our cryptocurrency into fiat currency, we will sell it to an advertiser with a public offer. the P2P transaction page lists all available advertisers that meet our pre-defined criteria – i.e. willing to accept our USDT and pay in PKR fiat currency.
There are various factors to consider before selecting advertisers for our deals. All of them are highlighted in the screenshots below.

As shown in the screenshot above, advertisers are listed with various statistics and tags. For example, the verified label is important because it means that the particular advertiser has been authenticated and meets the minimum requirements to receive the badge.
Similarly, each advertiser’s statistics are displayed under their name, and these include the total number of orders executed by that advertiser and the successful completion rate. Advertisers with a large number of orders and a good completion rate (close to 100%) should be preferred.
Other factors include the advertiser’s limit, which is indicated in a separate column that shows the minimum and maximum amount the advertiser is willing to exchange.
While advertisers are ranked based on price (the highest price is on top), your decision should take into account all of the above factors as well as supported payment methods. In the screenshot above, we can see that some advertisers support multiple payment methods, including bank transfers as well as mobile payments, while others only support bank transfers.
Once you have chosen a suitable advertiser that meets your requirements, you can click Sell USDT to proceed with the order.
Step 4: Place your P2P order
You will see a pop-up window with the details of the advertiser you selected in the previous step and the fields you need to fill in order to place a P2P order.
Here you will enter the amount of USDT you wish to sell (your available USDT balance is shown under this field) and you will be shown the amount you will receive for fiat currency exchange.
Once you have verified all the details and selected the payment method, click Sell USDT to proceed.
Please note that after this step you will not be able to cancel the order from your side.

Step 5: Wait for payment from advertisers
After you have placed your order, the next screen will display more details, including the advertiser’s name (i.e. the name of the payer), your own receiving account details and order tracking information, such as the order number and time.
You will also see a chat window on the right side that allows you to communicate with the advertiser. However, since all the details are already set up, there is not much need for any coordination other than to confirm the payment.
Most advertisers will send you a screenshot of the payment through this chat window, allowing you to verify it with your collection account.
There are two details worth noting here, the first is the timer, which starts at 15 minutes and keeps running while you wait for the advertiser to pay. If the advertiser does not confirm payment within this time, the order will be cancelled.
The second thing to notice is the inactive button that says “Release Cryptocurrency”. This button remains inactive until the advertiser confirms that they have paid you.

Step 6: Confirm receipt of payment and release cryptocurrency
Once the advertiser confirms that they have made a payment to your collection account, you will be notified to verify and release the cryptocurrency. At this point, we recommend that you check your receiving account to see the amount you expect and the details of the payer.
Once you are satisfied, you can complete the order by clicking on the Release cryptocurrency button that is now active.

If you don’t receive your payment in time, you can also click on Appeal to contact support and seek a resolution.
After you have released your cryptocurrency, you will see a confirmation of your order completion and can click Asset Transfer to track the transfer details.

Cancellation rules for P2P trading
OKx P2P trading service prioritizes user convenience and security. There are specific rules that apply to buyers and protect sellers on the platform (since sellers have delivered their assets to escrow when they place an order).
These rules apply to two types of users: new users (who have completed fewer than three P2P orders) and returning users (who have completed three or more P2P orders). New users who cancel five orders within one day before payment or three orders within one day after payment is confirmed will face service restrictions. Meanwhile, veteran users will trigger the limit if they cancel three orders on the same day prior to payment or cancel one order after payment is confirmed.
The service restriction increases with the number of triggers in a day. The first trigger will result in a 15-minute ban on purchases via P2P transactions, quick buys/sells, and a ban on posting or modifying purchase orders. More triggers will result in a 1-hour ban, a 4-hour ban, and then the user is banned for the entire day.
Withdraw FAQ
Why have I still not received my withdrawal?
After submission, withdrawal requests are sometimes sent to the OKx compliance team for manual review. Some withdrawal requests – especially large withdrawal requests – must be approved before we can submit them to the relevant blockchain network. Sometimes, we may require additional documentation from users to process withdrawals.
After a withdrawal is approved, OKx submits the transaction to the relevant blockchain network. The network fee included in the request must be large enough to incentivize the network validator to include the transaction in the block. When the verifier does include it in the block, you should see the transaction appear in your cryptocurrency wallet.
However, these funds will not be spent immediately. Different blockchain networks and wallet applications require a different number of confirmations before they will consider the transaction final and therefore spendable. Once you see the withdrawal appear in your wallet, simply wait for more blocks to be added to the blockchain and your balance will become spendable.
How do I find my transaction ID?
You can check the progress of any cryptocurrency transaction by entering the transaction ID in the blockchain explorer. The process for finding a transaction ID is slightly different on the OKx mobile app and website.
In the mobile app, click on Assets on the toolbar at the bottom of the screen. Then, click on “Withdrawal“.
On the “Withdrawals” screen, click the “History” button in the upper right corner – it is a button with a clock.

Find the withdrawal transaction ID you want from the list in the “History” section, then click on the three dots next to it. You can then copy the transaction ID and paste it into the blockchain browser of your choice.

To find the transaction ID after you have withdrawn funds through the site, click on Withdrawals in the upper right corner of the screen under “Assets”.
At the bottom of the “Withdrawals” section, you will see a list of recent withdrawals. You will find the transaction ID in the fourth column, labeled TXID. Copy this ID and paste it into the Blockchain Explorer of your choice to check the progress of your withdrawals.

When will I receive my withdrawal and do I need to pay a withdrawal fee?
Your wallet will be notified of your withdrawal once OKx has submitted the transaction to the relevant blockchain network. In many cases, this is automatic. However, in some cases, withdrawals require manual verification.
Your balance will not become immediately spendable. The network will need to confirm it before you can use the withdrawn funds for transactions. Different blockchain and wallet applications require a different number of confirmations before a transaction is considered final. Confirmation occurs when a new block is added to the blockchain after the block containing your transaction.
OKx does not charge a fee to withdraw assets from the application or website. However, a network fee must be paid to incentivize network validators to include your transactions in the block. In most cases, our suggested network fee will be sufficient to ensure fast withdrawals. However, if the withdrawal network is particularly congested, especially if the transaction is urgent, you may consider increasing the suggested fee.